Meta Ad Prompts for Outdoor Gear and Sporting Goods
Use the prompts on your real offer
Generate these ad angles for your product
Skip the blank prompt box. Paste your product page and ADEN'S LAB applies the angles to your offer, images, headlines, and copy.
Free to try No signup No prompt writing

Outdoor gear ads fall apart when the image says more than the product page can prove. That is the main risk with static Meta ads for packs, coolers, watches, and other spec-led products. The fix is simple: build each ad from one buyer motive, one page-backed claim, and one visual that matches the source. This page gives a tight set of static ad prompt directions for outdoor and sporting goods, plus a clean way to move them into ADEN'S LAB: paste a supported URL, let the tool pull available visuals and messaging, generate hundreds of Meta ads, then review, download, and test only the angles the page supports.
Start with the claim, not the layout.
Static outdoor ads usually work best when each concept answers one clear buyer question:
- Will it hold up?
- Does it have a hard spec?
- Will it work in my setting?
- Does it fix a known pain?
- Is there proof on the page?
- Is there a live offer?
If the product page cannot answer one of those with a checked source, that angle should stay out of the first batch.
The core rule is blunt: no proof, no ad.
That matters more in outdoor than in many other categories because the buyer often scans for hard details fast. If a trail pack weighs 2.4 lb, the ad can say 2.4 lb. If the page only says “lightweight,” the ad should not turn that into a number, a comparison, or a bigger promise.
The best prompt inputs are narrow.
Instead of asking for “a strong ad for this backpack,” the better input is closer to:
- product URL
- buyer motive
- one exact claim from the page
- one matching image type
- one short on-image line
- any proof that must appear
That keeps output clean and keeps review simple.
A good static concept for this category usually has five parts:
-
Hook
One buyer-facing angle tied to a page claim. -
Visual direction
Product close-up, field photo, flat-lay, split frame, or proof-led setup. -
On-image text
One short line. Usually a spec, use case, or verified label. -
Proof needed
Spec table, warranty terms, source page language, rating, review count, or offer terms. -
Headline and primary text direction
The ad copy can add context, but it should not add new claims.
Here is a clean way to sort the first batch.
| Buyer motive | Best static angle | What must exist on the page |
|---|---|---|
| Durability | seam, fabric, stress-point close-up | exact build or material detail |
| Performance | number-led image | exact spec with unit |
| Use case | product in named setting | page copy and matching photo |
| Problem/solution | pain-first setup | stated feature tied to that pain |
| Proof | standard, warranty, or source-backed label | exact proof language |
| Offer | price, deadline, or bundle | live landing-page support |
This is where weak testing often starts: six ads go live, but four are just rewrites of the same angle. The better route is to test different buying motives, not tiny copy changes.
For outdoor gear, the strongest first-round static prompts usually come from a short list.
1. Durability prompt
Use this when the page names a fabric, reinforcement point, shell material, or build detail.
Prompt direction:
- show a close crop of the highest-wear area
- keep background clean
- on-image text: exact material or construction term from the page
- no weather or safety claim unless the page states it
This works because the image does one job: show the build detail fast.
2. Hard-spec prompt
Use this when the page gives one clear figure such as weight, capacity, battery life, or dimensions.
Prompt direction:
- product centered on plain background
- big number as the main text element
- on-image text: exact figure and unit only
- copy explains what the number means in use
If the page gives 32 L and 2.4 lb, those can anchor the ad. If it does not, skip the spec-led route.
3. Use-case prompt
Use this when the page names the activity and shows it.
Prompt direction:
- place the product in the page-backed setting
- on-image text: activity name only
- no added terrain or condition language
- headline stays close to the page wording
A page that says “day hike” does not support “multi-day alpine use.” That gap matters.
4. Problem-first prompt
Use this when the page names friction clearly, such as poor organization, hard access, unstable carry, or bulky setup.
Prompt direction:
- lead with the problem on the image or in headline
- show the product solving it in one frame
- keep claim narrow
- support with one feature from the page
This angle can work well when the category pain is easy to show in a still image.
5. Proof-led prompt
Use this when the page includes a source-backed proof item such as a certification, warranty statement, or published standard.
Prompt direction:
- make the proof the main label
- keep visual simple
- explain only what the proof covers
- avoid outcome claims that go past the source
This is one of the safer routes when the page has hard support but limited lifestyle assets.
6. Offer prompt
Use only when the offer is live and clear on the landing page.
Prompt direction:
- show the exact offer terms
- include date or limit if listed
- avoid vague urgency
- keep all price language synced with the page
If the offer is not active on the destination page, cut the ad.
The practical filter before launch is simple:
- Exact spec on page = usable
- Named setting on page = usable
- Proof item on page = usable
- Soft brand line with no backup = hold
- Comparison without source = cut
- Protection or endurance language without support = cut
That filter also maps cleanly into ADEN'S LAB. The workflow is narrow on purpose:
- Paste a supported product URL.
- Let the product extract available visuals and messaging from the page.
- Generate multiple static ad options from those inputs.
- Review outputs against the page claim.
- Download the approved ads.
- Test selected angles in Meta.
That setup is most useful when the source page is already tight. If the page has thin specs, loose copy, or weak image support, the ad batch will reflect that. The right move is to fix the input before asking for more output.
A simple prompt template helps keep teams aligned:
Build a static Meta ad for this outdoor product using one page-backed angle only.
Buyer motive: [durability / performance / use case / problem-solution / proof / offer]
Source claim: [exact text from page]
Visual direction: [close-up / product-only / lifestyle / split frame / proof label]
On-image text: [one short verified line]
Do not add claims beyond the page.
Keep copy tied to the listed source.
That is the article’s main promise: not more ideas for their own sake, but a tighter way to turn outdoor product-page inputs into ready-to-test static concepts.
For first-round testing, the cleanest batch is usually five ads across five motives, with the offer angle added only if the landing page supports it that day. That gives a better read on what moved the click: build detail, hard number, use case, pain solved, or proof.
Use ADEN'S LAB the same way: paste the product URL, generate multiple static directions from page-backed inputs, then keep only the ads that stay inside what the source can prove.
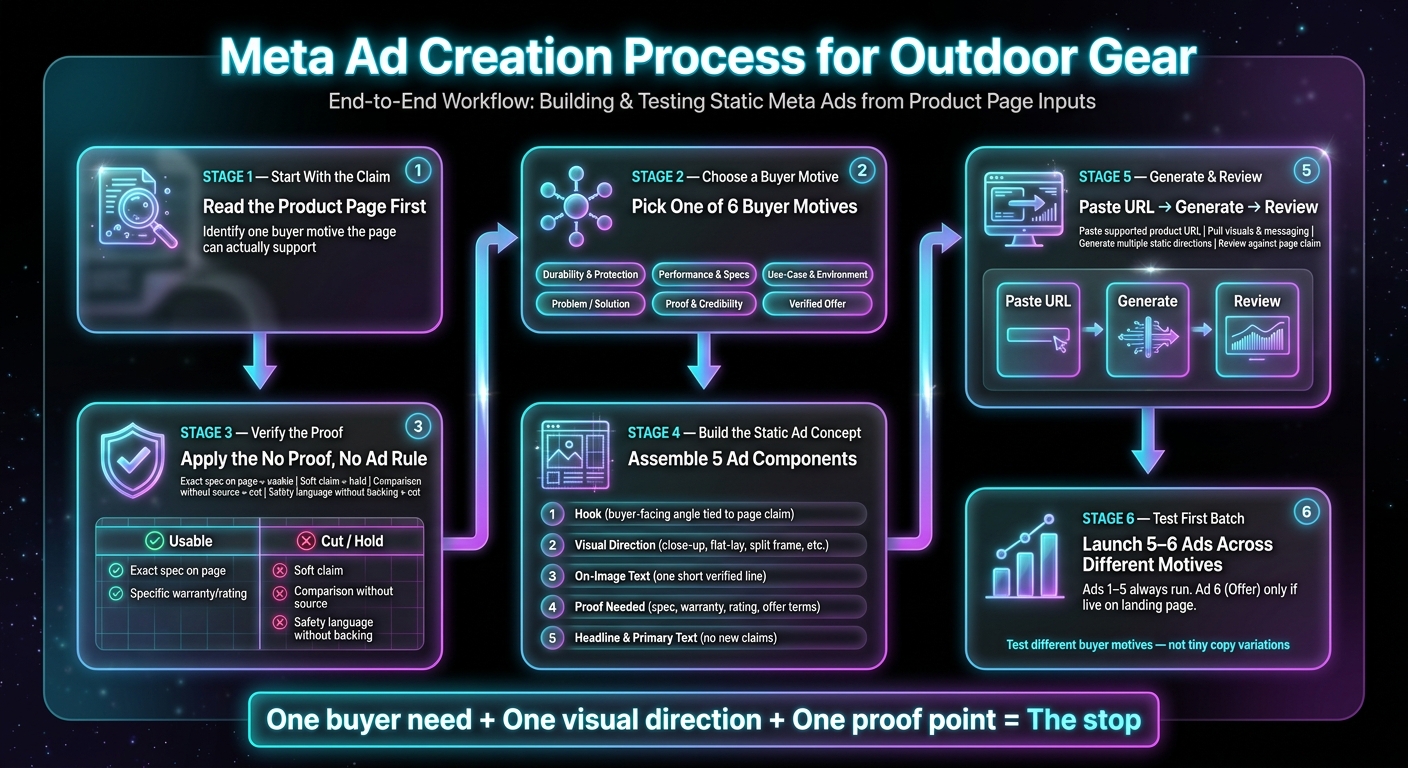
Meta Ad Creation Process for Outdoor Gear: From Product Page to Live Test
How to Use These Creative Briefs
Start with the buyer job the product needs to prove. That decision drives the visual, the claim, the proof, and the on-image line. Read the product page first. Then pick the buyer job the page can actually support. Don’t force an angle the page can’t back up.
Use the table to match the strongest claim on the product page to the first angle worth testing.
Match each buyer job to proof you already have.
| Category | Buyer question | Proof needed |
|---|---|---|
| Durability & protection | Will this hold up when conditions get bad? | Verified product specs or primary-source durability details |
| Performance & specs | Does this give me a measurable edge? | Verified quantified specs |
| Use-case & environment | Will this work in my specific situation? | Real environment photo or location-specific product detail |
| Problem & solution | What pain does this solve? | Verified feature, use-case detail, or before/after context |
| Proof & comparison | Why should I trust this over what I already own? | Verified reviews, ratings, or field data |
| Identity & community | Does this brand reflect who I am? | Authentic lifestyle imagery and real audience proof |
| Offer & urgency | Is there a real reason to buy now? | Verified price, discount, or deadline |
The sections below turn each buyer job into a static ad brief.
One rule matters more than the rest: every claim needs proof. If proof is missing, that brief should not go into launch. That keeps the test clean and avoids wasting spend on angles that look strong in copy but fall apart on the product page.
Keep on-image text to one short line with high contrast. Static ads usually get weaker when the image tries to explain too much. The job of the image is to make the claim legible at a glance, not tell the whole story.
In ADEN'S LAB, the workflow is simple: paste a supported product URL, let the tool pull available visuals and messaging from the page, generate a set of static creative directions, then review, download, and test the ads that match claims the page can prove. That matters here because these briefs are not meant to be loose ideas. They’re meant to become ready-to-test static concepts tied to what the landing page already says.
This article uses the fictional Ridge & Run Trail Pack 32L as a worked example. Treat every output from that example as illustrative only.
sbb-itb-628c49f
Put the playbook to work
Apply this playbook to your page
Paste your website and the Lab will turn the strategy you are reading into a ready-to-test ads.
Free to try No signup No prompt writing
1. Durability & Protection
Use these briefs only when the product page shows proof for the material, build, or protection claim. If the page can’t back it up, don’t use the angle. This set is for products where construction, material choice, or use setting does the selling.
- The Stress-Point Close-Up
Zoom in on the part that takes the most wear: a seam, joint, or reinforced connection. Add one short on-image label that names the confirmed build detail, such as "Reinforced Connection Point." The page needs to confirm that construction detail, either in a callout or spec sheet. The job here is simple: sell the documented build, not a protection claim that isn’t stated.
- Material Origin Shot
Use a flat-lay of the product next to the raw material or a material swatch. The on-image text should pull the material spec straight from the product page, for example "Verified Material Spec." This only works when the page gives a clear material spec.
Flag: Do not suggest protection unless the page includes a test, standard, or stated material trait that supports it.
- The Conditions Contrast
Build a split-frame. One side shows the product in a clean studio setup. The other shows it in the exact outdoor setting supported by the page. Use a short environment label like "Built for the Real Use Case." The proof requirement is strict: there must be a real photo showing that use setting. Don’t stretch from one setting to another. If the page shows beach use, don’t turn it into mountain use. This angle works best when the setting itself is a main buying reason.
- Verified Trait Headline
Put one confirmed physical trait at the center of the visual. Use high-contrast type over a clean product image. The headline should match the claim exactly, and the primary text can explain it. The product page or spec sheet needs to use that same language.
Flag: Copy the trait as written. Don’t turn a narrow claim into a broad performance promise.
- The Load-in-Use Visual
Show the pack, cooler, case, or similar gear in a real setup: carried, packed, stacked, or placed in the use setting. Add one verified load or durability spec from the page as the on-image text. This needs support from a page spec or a documented construction detail. Use this angle when structure or materials are a main reason someone buys.
- Pre-Use Gear Check
Use a flat-lay with the product and one visual cue tied to the stated use case. The on-image text should quote one protection trait exactly as it appears on the page. That claim has to be clear enough to lift without stretching the meaning. Keep the setup tied to the use case the page supports, and leave out any rough conditions the page doesn’t show or state.
These briefs fit best when the product page already puts the proof in plain sight. That matters inside ADEN'S LAB too. Paste the product URL, let the tool pull the available visuals and messaging, then generate ad copy ideas and static concepts around the claims the page can actually support. Review the outputs, keep the ads that stay tight to the evidence, and test those first.
2. Performance & Specs
Use this section only when the product page gives a verified number. If there’s no hard spec, skip the performance angle. That keeps the ad tied to proof instead of soft claims.
- The Hard-Number Hook: Pull one page-verified metric and make it the main visual element. Use large, high-contrast type over a clean product shot. The image text should show the number and unit only. The primary text should explain what that number means in actual use.
- The Precision Callout: For navigation, tracking, or fitness wearables, lead with the accuracy, refresh rate, or elevation-tracking spec the page confirms. Show the device in use. Don’t rely on a flat-lay if the point is field performance.
- The Comparison Frame: Use a split frame only when the page gives a figure that makes sense at a glance. Put the product on one side and the verified spec on the other. Do not invent a comparison point the page doesn’t state.
- The Spec-to-Setting Match: Pair one verified performance spec with a use setting the page supports. The image text should match the spec. The visual should match the setting. Don’t suggest field conditions the page can’t support.
- The Efficiency Callout Box: Put one documented time, weight, battery, or setup claim in a bold callout box over the product image. Keep it to one line. Let the primary text add context, but make the visual do the first job.
- The Multi-Spec Grid: If the page gives three verified specs, place them in a clean three-cell grid over the product image. Each cell should include one spec label and one confirmed figure. Don’t add claims beyond the page. This works when the product has enough depth to justify a spec-led static. If the page does not give a real number, move to use-case & environment.
Flag for all six briefs: Any percentage-based performance claim requires the page to show the comparison baseline and the test or source behind it. If the page doesn't show the methodology, drop the percentage and use the absolute figure instead.
This is also where ADEN'S LAB fits cleanly into the workflow. Paste the product URL, let the tool pull available visuals and copy from the page, then turn those verified specs into multiple static directions. Review the outputs, download the ones that stay inside the page claim, and test only the ads the source can support.
If the page gives a number, use this section. If it gives a setting, move to use-case & environment.
3. Use-case & Environment
If the page doesn’t give a hard number, shift from specs to context. The setting can carry the message, but only when the page itself names that activity, place, or condition. Don’t use these briefs just because the image suggests a scene. Use them when the copy backs it up.
- Trail Use Case Frame: Put the product in a trail or cross-country setting the page clearly supports. On-image text should name the activity only. The primary text should spell out why the gear fits that use case. Requires: a matching lifestyle image and page copy that supports the scene.
- The Severe-Weather Setting: Show the product in a weather condition the page actually mentions. Don’t turn that into a protection claim or rating. On-image text can name the weather condition only when the page supports it. Requires: page copy that clearly names the weather condition, plus a matching photo.
- The Camp-to-Trail Arc: Use a two-panel layout. The left panel shows the product at camp. The right panel shows it on the trail. On-image text on each panel names the setting. The primary text connects both scenes to one page-backed benefit. Requires: two distinct lifestyle images and a verified use case that spans both settings.
- The Everyday Carry Drop-In: Place the product in an everyday-carry transition when the page positions it as everyday carry or navigation gear. Keep the copy tight. Focus on moving from point A to point B, not vague lifestyle language. Requires: page copy that clearly supports everyday carry, commute, or navigation use.
- The Cold-Weather Start: Show the product in a cold-weather setting when the page supports skiing, winter hiking, or another low-temperature use. On-image text should point to the use case, not a temperature rating the page doesn’t list. Requires: a lifestyle image with clear cold-weather cues and matching page language.
- The Waterside Frame: For fishing or other waterside gear, place the product at the water’s edge with the user in motion. On-image text should name the use case only if the page copy supports it. The primary text should stay on what the user can do, not on protection claims the page doesn’t verify. Requires: a waterside photo and matching page copy.
| Brief | Safe headline angle | What to avoid | Needed proof |
|---|---|---|---|
| Trail Use Case Frame | Named activity | Implied performance claim | Activity named on page |
| Severe-Weather Setting | Named weather condition | Protection or rating claim | Weather condition named on page |
| Camp-to-Trail Arc | One confirmed benefit across two scenes | Two unrelated messages | Two images plus confirmed use case |
| Everyday Carry Drop-In | Transition or route use | Broad lifestyle filler | Everyday carry, commute, or navigation language |
| Cold-Weather Start | Winter activity | Unlisted temp claim | Cold-weather use named on page |
| Waterside Frame | Waterside activity | Unverified protection claim | Waterside use named on page |
If the page shows the setting but does not name it, use it as context only - not the headline.
In ADEN'S LAB, this is straightforward: paste the product URL, let the tool pull the available visuals and copy, then build static concepts around page-backed settings only. Review the generated creatives, cut anything that goes past the source page, and follow a pre-launch ad testing checklist for the versions where the environment sharpens the use case instead of trying to replace proof.
4. Proof & Comparison
Use this section when the product page gives hard proof: exact specs, a named test standard, or a published comparison. This sits one step past general context. The ad is no longer saying where the product fits. It is showing what the page can prove.
When that proof exists, make it the center of the static. Lead with numbers, labels, and standards people can check. Don’t build the visual around mood and then tuck the evidence into body copy. Build the visual around the evidence first.
- The Spec-for-Spec Callout: Pull two or three specs straight from the product page and place them next to a published benchmark or prior model. Keep the on-image text to the numbers only. Use the primary text to explain what those numbers mean in use. Requires: exact specs from the product page and a documented comparison source.
- The Standard Close-Up: Take one published test standard and make it the focal point of the image. The primary text should explain what the standard measures, not what people should infer from it. Requires: the exact standard name, the issuing body, and a source that explains the test scope.
- The Before/After Setup Swap: Put the prior setup or documented alternative on the left and the featured product on the right. Label each side with one factual difference. No opinions, no “better” language. The primary text should connect that difference to an outcome the page supports. Requires: a documented spec difference and two clearly different product images.
- The Weight-Savings Visual: For ounce-sensitive products, show the exact weight in large type with a scale prop or weight cue. Requires: the verified product weight from the page, in ounces or pounds, not a rounded estimate.
| Brief | Core proof element | What to avoid | Required source |
|---|---|---|---|
| Spec-for-Spec Callout | Page-verified specs | Vague superiority | Product page + documented comparison |
| Standard Close-Up | Published test standard | Beyond the standard | Official standard page |
| Before/After Setup Swap | One documented spec difference | Subjective judgment | Product page + comparison source |
| Weight-Savings Visual | Exact weight in oz/lbs | Rounded estimate | Product page spec table |
In practice, pick the strongest proof type first, then match it to the cleanest static layout. Don’t start by picking a format like split-screen or close-up and then hunting for support after the fact. Start with the proof. Then build the image around that proof.
This maps cleanly into the current ADEN'S LAB workflow. Paste a supported URL, let the product pull available visuals and messaging from the page, generate multiple static directions from that material, then review and download the versions that keep the proof clear enough to test. If the page includes exact specs or a named standard, this is one of the safest routes to turn that source material into a static ad without drifting into claims the page doesn’t support.
Five Strong Concepts Mapped from Product Page Input to Static Ad Output
Illustrative example: a fictional outdoor backpack shows how exact product-page inputs become static ad components. Use only verified page wording, numbers, and certifications. These examples show the handoff from page evidence to static layout, not a broader strategy.
This is the core discipline behind static ad production that doesn’t drift into made-up claims: each ad element needs a clear source on the product page. If the page names a material, shows a packed weight, lists a certification, or defines the use case, that input can move into the ad. If it doesn’t, it stays out.
In ADEN'S LAB, that means the workflow stays tight. Paste a supported product URL, let the platform pull available visuals and copy from the page, generate multiple static directions, then review what each concept is actually based on before download and testing. The point is not to make the ad sound bigger than the page. The point is to turn page proof into ready-to-test static creative.
Concept 1 - Durability/Protection: The Material Close-Up
Page input: The materials section lists the outer shell fabric and any verified weather-resistance rating.
This concept works when the page gives a hard spec, not vague brand language. If the product page names the shell fabric or shows a weather-resistance rating, that line becomes the hook.
- Hook: Lead with the exact material or verified rating from the page.
- Visual composition: Extreme close-up of the fabric texture or surface treatment. No model, no landscape.
- On-image text: The exact material name or verified rating from the product page.
- Proof requirement: ⚠️ Requires the verified spec table. Do not round, paraphrase, or upgrade the claim.
- Headline/primary text direction: Use the page's exact wording for the material or weather context.
The practical point here is simple. A close-up ad has very little room to hide weak proof. If the page says “ripstop nylon,” use that. If it lists a weather rating, use the exact rating. If it only says the bag is built for rough conditions, that is not enough for a proof-led static.
Concept 2 - Performance/Specs: The Weight-Savings Visual
Page input: Packed weight and capacity from the spec table.
This is a numbers-led ad, so the numbers must be exact. No rounding. No “about.” No turning a listed weight into a bigger promise than the page supports.
- Hook: Use exact packed weight and capacity from the spec table.
- Visual composition: The product on a clean background or hanging from a scale.
- On-image text: The exact weight and capacity from the page.
- Proof requirement: ⚠️ Requires verified packed weight and capacity. Do not estimate or round.
- Headline/primary text direction: Connect the numbers to the use case the page actually supports.
This kind of ad usually lives or dies on precision. If the page gives 22 L and 2.4 lb, the ad should say 22 L and 2.4 lb. Not “lightweight.” Not “roomy.” The spec is the message. The copy can connect those figures to the use case, but only if the page already makes that link.
Concept 3 - Use-Case/Environment: The Terrain Match
Page input: The intended use section and a lifestyle photo that clearly shows the environment.
Some product pages do a decent job of showing where the product belongs. When they do, there’s no need to invent a scene or stretch the use case.
- Hook: Use the page's named use case and matching environment cue.
- Visual composition: Crop the existing lifestyle photo so the terrain or environment cues stay visible.
- On-image text: A short label that mirrors the page's own use-case language.
- Proof requirement: Require page copy that names the activity and environment exactly. Do not upgrade the use case.
- Headline/primary text direction: Describe the terrain or conditions using the page's own language.
This is where a lot of static ads go off track. A page might say “day hikes,” then the ad starts implying alpine trekking. That gap matters. If the page supports trail use, stick to trail use. In ADEN'S LAB, this is one of the cleaner inputs to map because the source image and the page copy usually sit side by side.
Concept 4 - Verification Close-Up
Page input: Any verified certification, warranty statement, or third-party proof that appears on the product page.
This concept is useful when the page includes proof that can reduce doubt without drifting into legal or performance claims the proof does not support.
- Hook: Lead with the exact certification, warranty, or third-party proof named on the page.
- Visual composition: Close-up of the relevant product detail with a clean text overlay.
- On-image text: The exact certification, warranty, or proof language from the page.
- Proof requirement: ⚠️ Requires a source you can verify before launch. If the page does not contain it, do not add it.
- Headline/primary text direction: Explain what the proof covers, and avoid claiming outcomes it does not cover.
The guardrail here matters. A certification can support a narrow statement. A warranty can support a warranty statement. Neither gives permission to promise product outcomes beyond what the page or the source says. That’s why this concept works best when the asset stays close to the wording and keeps the overlay clean.
Concept 5 - Identity/Community: The Fit Qualifier
Page input: The sizing chart and any review language that describes fit.
Fit is often one of the highest-friction parts of a product page, but it’s also one of the easiest places to overstate. The chart is the source of truth. Reviews can help frame the issue, but they should not become ad text unless the page itself supports that wording in a way you can stand behind.
- Hook: Lead with the fit problem the sizing chart solves.
- Visual composition: A model photo that clearly shows fit geometry if the page provides one.
- On-image text: The exact sizing range from the chart, if verified.
- Proof requirement: ⚠️ Requires the verified sizing chart. Use review language only as fit input, not on-image text.
- Headline/primary text direction: Reference the fit issue the page addresses and connect it to the sizing information.
This is a good example of using page evidence with restraint. Review language can point to what buyers care about, like strap fit or torso sizing, but the on-image text should stay tied to the chart. That keeps the ad clean and keeps the claim grounded.
Across all five concepts, the same rule holds: the hook, image treatment, and text overlay should all trace back to one clear page input. That makes review simpler and testing cleaner. Instead of debating whether a concept “sounds right,” the team can check whether the page actually supports it.
A simple pre-test filter helps:
| Check | What to confirm on the page | What happens in the ad |
|---|---|---|
| Spec proof | Exact material, weight, capacity, or sizing data is listed | Use exact wording and numbers |
| Use-case proof | The page names the activity or setting | Mirror that language in hook and headline |
| Visual proof | The page includes a usable product or lifestyle image | Build the layout from page-sourced visuals |
| Verification proof | Certification, warranty, or third-party support appears on-page | Keep the claim narrow and exact |
That’s the practical promise of this mapping approach. It gives a fast way to judge whether a product page can support a first batch of static ads before time gets spent polishing weak concepts. If the page has the proof, ADEN'S LAB can turn that source material into multiple static routes for review, download, and live testing. If the proof is thin, the right move is usually to fix the page inputs first rather than force the creative.
Input Quality Checklist for Outdoor Product Pages
Use this checklist before a brief becomes a static ad. The job is simple: sort launch-ready ideas from ideas that still need proof.
If a page misses any row below, cut the related brief from the test batch. No guessing. No filling gaps with ad copy.
| Input category | What the page must include | Verification note |
|---|---|---|
| Performance metrics | Exact figures for the metric you plan to advertise: weight, capacity, dimensions, speed, endurance, or range | Use the page's exact numbers and units. |
| Technical precision | For GPS devices, trackers, altimeters, and wearables: exact accuracy, sampling, or logging frequency | Use the spec sheet's exact figure. |
| Comparison claims | Any comparison language the ad will use | Only use a comparison if the source page supports it and the comparison is relevant to the claim. |
| Safety, protection, endurance, or performance claims | Any safety, protection, endurance, or performance claim | Verify the claim is explicitly supported by the source page before it goes into ad creative. |
The standard is strict on purpose. If the page cannot supply proof for the claim, the page is not ready.
That matters even more with outdoor products, where buyers often scan for hard specs fast. A pack either weighs 2.4 lb or it doesn’t. A GPS watch either logs at a stated interval or the page stays silent. Once the source page is vague, the ad gets weak fast.
This is also where the workflow in ADEN'S LAB either works cleanly or breaks down. The tool can pull available visuals and messaging from a supported URL, then turn those inputs into multiple static ad directions. But it can only work with what the page gives it. If the product page has exact specs, supported claim language, and usable image assets, the next step is straightforward: generate options, review them, download the best ones, and test the selected ads. If the proof is missing, the right move is to stop before generation, not patch the gap later in Meta copy.
A simple rule helps here:
- Specific claim on page = usable ad angle
- Soft claim with no proof = hold
- Comparison with no source support = cut
- Safety or endurance language without explicit backing = cut
This keeps the first batch clean. It also protects testing quality. Bad inputs don’t just create risk; they muddy results. If one static ad is built on a hard number and another leans on loose phrasing, performance data from that batch tells you less than you think.
The next section turns the approved inputs into the first six ads I would test.
First Six Ads I Would Test
Once the inputs are approved, build the first batch around buyer motive. The point is simple: each ad should answer a different buyer question, not repeat the same pitch six ways.
| Ad # | Concept category | Hook/angle | Hypothesis | Proof required before launch |
|---|---|---|---|---|
| 1 | Durability & protection | Lead with the exact protection claim the product page supports. | This concept tests whether protection specificity drives CTR. Buyers shopping for that condition should react faster to a named protection claim than to a generic "built tough" line. | The exact protection claim from the product page. |
| 2 | Measurable performance | Lead with one hard spec as the main on-image text. | This concept tests whether quantified specs outperform qualitative adjectives. A precise number gives the buyer a comparison point that vague language cannot. | The exact figure, unit, and context from the product page or spec sheet. |
| 3 | Use-case & environment | Show the product in its exact outdoor use case and name that scenario in the headline. | This concept tests whether scenario clarity increases relevance. A buyer self-selects when the ad mirrors the job they need the gear to do. | A product-page image or description that confirms the stated use case. |
| 4 | Problem/solution | Open with the friction point the product is meant to reduce, then show the product as the fix. | This concept tests whether problem-first framing earns more scroll stops than feature-first messaging. Naming the friction before the product creates an attention break. | A product-page benefit statement or other verified product detail that explicitly names the problem being solved. |
| 5 | Proof & credibility | Use the strongest sourced proof available on the page as the main visual element. | This concept tests whether credible proof reduces hesitation. Validation from an authoritative source or other verifiable evidence shifts the burden of persuasion off the brand and onto proof. | Exact sourced proof only. |
| 6 | Verified offer | Lead with a concrete, time-bound or quantity-limited offer only if the product page actually states one. | This concept tests whether a verified offer accelerates decisions for buyers already in-market. This ad only works when the offer terms are explicit and live. | Exact offer terms, expiration date or quantity limit, and landing-page confirmation that the offer is active. |
Run Ads 1–5 in the first batch. Ad 6 is conditional. If the offer is not live, don’t force it. Swap in a second use-case variant instead.
That matters because offer-led ads can distort the read. If the offer is stale, unclear, or missing from the landing page, the test says nothing useful about motive. It just introduces avoidable noise.
This is also where ADEN'S LAB fits cleanly into the workflow. Paste a supported URL, let the product pull the available visuals and messaging from the page, generate multiple static concepts across these motive buckets, then review and download the ones that match verified claims. From there, test the selected ads in Meta without padding the first batch with unproven angles.
Use the first-week readout to analyze your Meta CPA and decide which motive earns the next round: spec-led, problem-led, proof-led, or offer-led.
Conclusion
Outdoor Meta static ads tend to work best when each concept does one job well: one buyer need, one visual direction, and one proof point that can be checked. That level of specificity is what gets the stop.
Use the mapped concepts and the first-six-ads matrix to pick the first test, keeping in mind Meta ad optimization best practices.
To move from planning into production, paste your product, landing page, offer page, or website URL into ADEN'S LAB. The tool pulls the visuals, positioning, benefits, and offer details it can find, then builds static Meta ads with image, headline, and primary text (or use a dedicated ad headline generator for more variety) across different angles and layouts. Paste your outdoor product URL into ADEN'S LAB and generate the first batch of ready-to-test static ads.
FAQs
How do I choose the best first ad angle?
Start with the angle the product page can support most clearly. Match the strongest proof on the page - specs, reviews, warranty, safety details, or performance evidence - to the job the customer wants done.
If the page gives you a few possible angles, lead with the one backed by the clearest product truth and the best visual support. That usually gives you the strongest first ready-to-test static ad.
What if my product page lacks hard proof?
If a product page doesn’t show hard proof, the main question is simple: does the material on the page meet the standard you need?
The ruling itself focused on a narrow point. It asked whether getting a user’s cell-phone location data counts as a search under the Fourth Amendment. The case was then sent back so the lower court could take another look at probable cause and particularity.
When should I use an offer-led ad?
The draft is off-topic.
It does not address offer-led ads. Instead, it talks about Chatrie v. United States and a court dispute over location data, geofence warrants, the Fourth Amendment, probable cause, and particularity. That has nothing to do with writing, testing, or improving static Meta ads built around an offer.
The fix is simple: remove the legal material and replace it with content tied to offer-led ads.
A usable direction would be:
- Define what an offer-led ad is
- Explain when to use one in Meta static creative
- Show the parts that matter most: offer, proof, urgency, CTA, and landing-page match
- Give a few ready-to-test static ad angles
- Tie it into the ADEN'S LAB workflow: paste a supported URL, extract the available visuals and messaging, generate multiple static creatives, review or download them, then test the selected ads in Meta
If this section is meant to correct the current copy, a tighter version would be:
The current answer misses the topic. It focuses on Chatrie v. United States and geofence warrant rules instead of offer-led ads. Replace it with guidance on how to build static Meta ads around a clear offer, matching message, proof, and CTA, then move those angles into ADEN'S LAB for fast creative generation and testing.
If you'd like, the next step can be a full rewrite of this section so it fits the article and keeps the same length target.
Your next ad batch starts here
Finish with a ready-to-test ad batch
Paste your website to generate static creatives. Drop the link → get ads in about 90 seconds → upload them to Meta → scale.
Free to try No signup No prompt writing