How to Build High-Converting Custom Audiences for Meta Ads
Turn the strategy into creatives
Create Meta ads for your product
Paste your product page. ADEN'S LAB turns the offer, audience, and positioning into complete ready-to-use Meta static ads.
Free to try No prompt writing

Stop wasting ad dollars on guesswork. Meta's interest-based targeting often leads to high costs and low returns. Instead, focus on custom audiences - targeting people who’ve already interacted with your brand. This approach can cut CPA by 47% and boost conversion rates by 2-5x.
Here’s how to build and optimize custom audiences for better Meta Ad performance:
- Install Meta Pixel: Track user behavior on your site to create intent-based audiences.
- Upload Customer Data: Use your email lists or purchase records for precise targeting.
- Leverage Engagement Signals: Retarget users based on actions like video views or social media interactions.
- Refine with Segmentation: Adjust retention periods, exclude irrelevant users, and layer audiences for better precision.
- Test and Improve: Use A/B testing to identify high-performing segments and creatives.
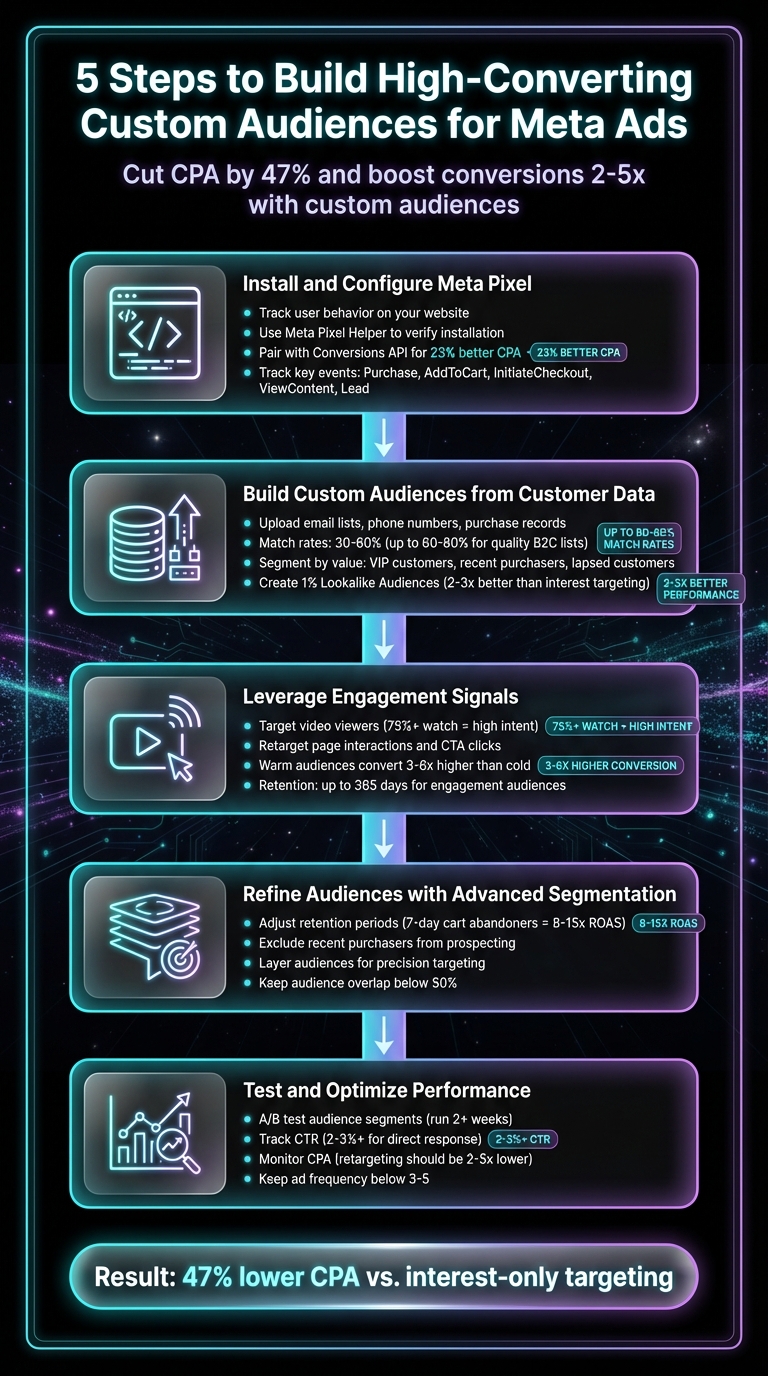
5-Step Process to Build High-Converting Meta Ad Custom Audiences
How to Create Custom Audience in Meta Ads Manager
Put the playbook to work
Apply this playbook to your page
Paste your website and the Lab will turn the strategy you are reading into a ready-to-test ads.
Free to try No prompt writing
Step 1: Install and Configure Meta Pixel
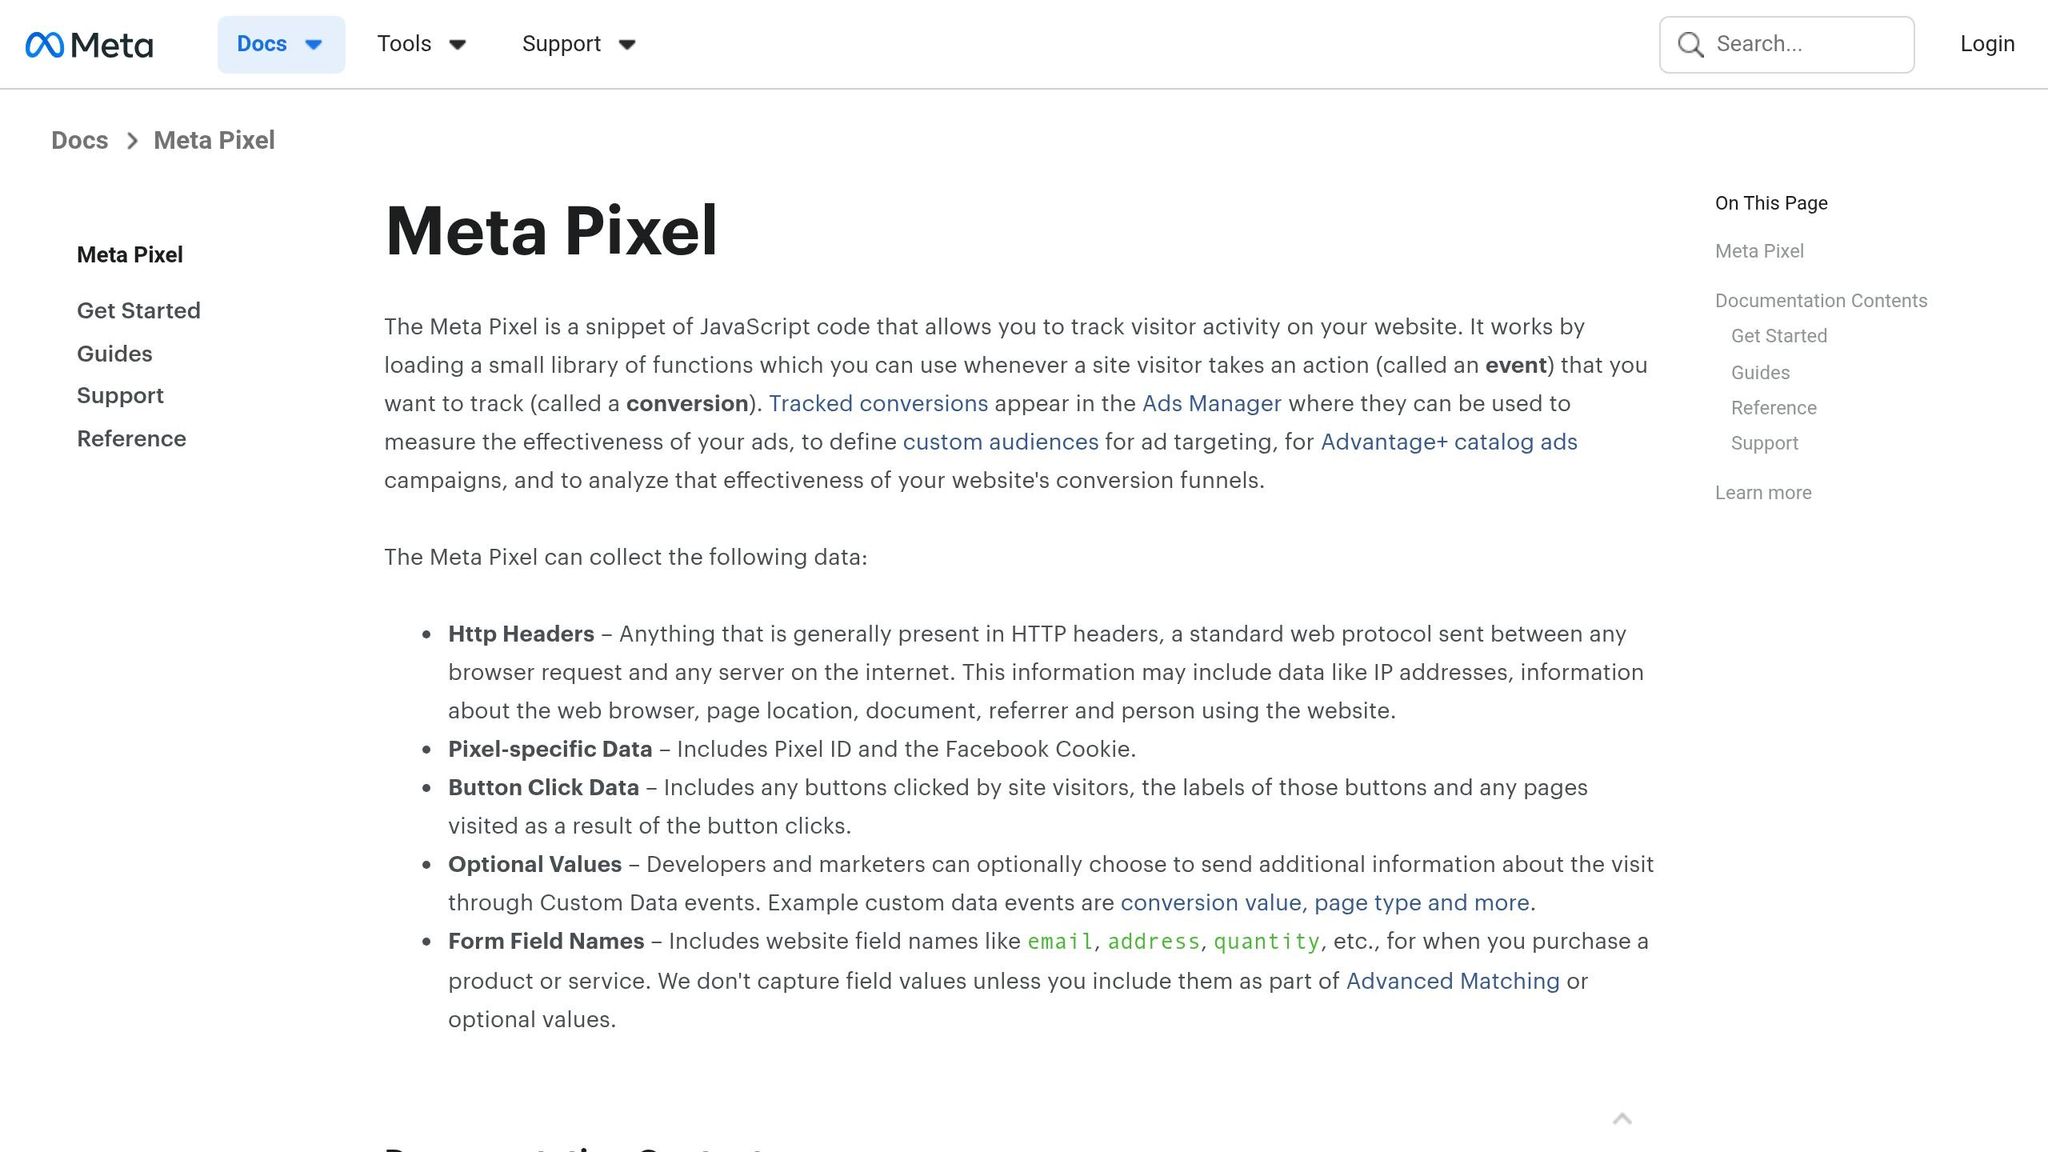
Meta Pixel is a small JavaScript snippet that you add to your website to track visitor actions, like page views or completed purchases. It plays a key role in creating custom audiences based on user behavior. Even if coding isn't your strength, the setup process is straightforward.
How to Add Meta Pixel to Your Website
Getting your Meta Pixel set up correctly is the first step toward building effective custom audiences.
Start by creating your pixel in Meta Events Manager. Select "Connect data", choose "Web", and give your pixel a name. This will generate a unique Pixel ID and base code. Copy the JavaScript code and paste it into the <head> section of your website's HTML, just before the closing </head> tag. Make sure this code is included on every page so it loads before users navigate through your site.
If you're using platforms like Shopify, WordPress, WooCommerce, or Wix, you're in luck - these platforms offer built-in tools to make installation and event setup a breeze, no coding required.
To confirm everything is working, use the Meta Pixel Helper browser extension. A green checkmark means your pixel is active and tracking events properly. For even better results, pair the browser-based Pixel with the Conversions API (CAPI). This combination can improve cost per acquisition by 23%, as CAPI recovers 15–25% of conversion events blocked by ad blockers.
Once your pixel is up and running, you'll have the data you need to build high-performing custom audiences.
Which Events to Track for Better Audiences
Tracking the right events is crucial for creating audiences with a higher likelihood of converting.
Meta's standard events - like "Purchase" and "AddToCart" - are optimized for their algorithm, so it's smart to stick with these predefined actions unless custom events are absolutely necessary. Events like "AddToCart" and "InitiateCheckout" are especially effective for retargeting campaigns. For instance, targeting users who abandoned their carts within the past week can deliver 8–15x return on ad spend (ROAS).
| Event Name | Purpose | Best Use Case |
|---|---|---|
| Purchase | Completed transaction | Driving e-commerce sales and ROAS goals |
| AddToCart | Item added to cart | Retargeting users who abandoned their carts |
| InitiateCheckout | Started checkout process | Retargeting users at the bottom of the funnel |
| ViewContent | Viewed a specific page | Product-level retargeting and Dynamic Ads |
| Lead | Form submission | Generating leads and sign-ups |
To optimize further, include parameters like value, currency, and content_ids. These details enable value-based optimization and enhance Dynamic Ads performance. Additionally, improve your Event Match Quality (EMQ) score - Meta’s measure of how accurately events are matched to users - by sending hashed customer data, such as emails or phone numbers, along with the events. Aim for an EMQ score of 6 or higher to ensure your ads are as effective as possible.
Step 2: Build Custom Audiences from Your Customer Data
Your existing customer data - like email lists, phone numbers, and purchase records - is one of the most powerful tools for Meta advertising. Unlike pixel-based audiences that rely on browser tracking, customer lists are first-party data you control. This makes them more dependable, especially as privacy rules become stricter.
The trick is uploading your data correctly and using it wisely to build audiences that outperform broad targeting.
How to Upload Customer Lists to Meta Ads Manager
Before you start, you'll need to agree to Meta's Custom Audience Terms of Service in Ads Manager. This is a one-time step you must complete manually.
Next, prepare your data in CSV or TXT format. Each identifier, like first name or email, should go in its own column. Including multiple identifiers (such as email, phone number, city, and ZIP code) can boost match rates by 15-25%.
Pay close attention to formatting:
- Convert emails to lowercase and remove extra spaces.
- Format phone numbers with the country code (e.g., +1 for US numbers) and use only digits (e.g., 15559876543).
- Names should be lowercase and free of punctuation or special characters.
| Identifier | Formatting Requirement | Example |
|---|---|---|
| Lowercase, trim whitespace | mary@example.com |
|
| Phone | Country code, digits only | 15559876543 |
| First/Last Name | Lowercase, letters only | smith |
| State (US) | 2-character abbreviation | ca |
Never include sensitive data like Social Security numbers, health details, financial accounts, or information about children under 13. Meta strictly prohibits uploading such data.
To upload your list, go to "Audiences" in Meta Ads Manager, click "Create a Custom Audience", and choose "Customer List." After uploading your file, Meta will hash (securely scramble) the data to protect privacy before matching it to user profiles. Match rates generally fall between 30-60%, but high-quality B2C lists can hit 60-80%.
For better results, avoid uploading one giant list. Instead, segment your customers into groups like "High-Value Customers" (top 10% by lifetime value), "Recent Purchasers" (last 30 days), or "Lapsed Customers" (no purchase in 90+ days). This lets you tailor your ads and build more effective lookalike audiences. Once you've identified your top segments, you can scale winning creatives to maximize the impact of these high-value groups. Use clear names for your lists, like CustomerList_VIP_Purchasers_Apr2026, to stay organized.
Since these lists are static snapshots, update them every 2-4 weeks to avoid performance drops as customer information and interests evolve.
With well-prepared and segmented customer lists, you're ready to create high-quality lookalike audiences.
Create Lookalike Audiences to Scale Your Reach
After uploading a customer list, you can use it as a "seed" to build lookalike audiences. Meta's algorithm analyzes your existing customers and finds new users with similar traits - like demographics, interests, and behaviors.
As Kiril Ivanov, a performance marketing specialist, puts it:
"Custom Audiences (First Party Data) are forever."
- Kiril Ivanov, Performance Marketing Specialist, AdsManagement.co
The success of your lookalike audience depends on the quality of your seed list. A list of high-value repeat buyers will deliver much better results than a broad list of website visitors. For your most critical lookalike campaigns, use your top 10-20% of customers by lifetime value as the seed.
To create a lookalike audience, go to "Audiences" in Meta Ads Manager, choose "Create a Lookalike Audience", and select your customer list as the source. Then, pick your target country (e.g., the United States) and a percentage. A 1% lookalike represents the closest match to your seed audience - around 2 million people in the US. Start with a 1% audience for conversion-focused campaigns, and only expand to 2-3% or 5% when your 1% audience is fully tapped.
Lookalike audiences often perform 2-3x better than interest-based targeting because they're based on real customer behavior. While Meta requires at least 100 people in your source audience, you'll see the best results with 1,000 to 5,000 matched users.
To avoid wasting ad spend, exclude your "Recent Purchasers (30 Days)" audience from lookalike prospecting campaigns. Keep in mind that it takes 6 to 24 hours for your lookalike audience to process and become ready for use.
Step 3: Use Engagement Data to Build Warm Audiences
Not everyone who sees your ads will visit your website. Some will interact in other ways - watching videos, liking posts, or clicking on your Facebook Page. These interactions are gold. They represent warm leads - people already interested in your brand - who convert at rates 3–6× higher than cold audiences. The challenge? Capturing these actions and turning them into custom audiences for retargeting with tailored ad copy.
Target Users Based on Video Views
Video engagement is a great way to segment audiences based on how much of your video they watched. To set this up in Meta Ads Manager, navigate to Audiences > Create Audience > Custom Audience, and select Video as your source. From there, choose which videos to include (from your Facebook Page, Instagram profile, or specific campaigns) and set a viewing threshold. Meta offers options like 3 seconds, 10 seconds, 15 seconds (ThruPlay), or completion percentages (25%, 50%, 75%, 95%). The longer someone watches, the more interested they are. For instance, viewers who watch 75% or more of your video are typically much closer to converting than those who only stick around for a few seconds.
Your retargeting strategy should match the viewer’s level of engagement. For those who watched only 3–25%, consider sharing educational content or brand stories. Meanwhile, viewers who watched 75% or more might respond better to case studies, testimonials, or direct sales offers.
Here’s an example: An online education company created a 5-part video series explaining its teaching approach. They retargeted viewers who watched 75% of each video with the next one in the series. By the fifth video, these engaged viewers were offered a course enrollment, leading to a 42% conversion rate.
You can also build a sequential retargeting funnel. Start with an educational video, retarget 75% viewers with a case study, and then retarget 95% viewers with a discount or limited-time offer. Exclude past purchasers to keep your audience fresh. This method can boost your return on ad spend by 20–40% when your messaging aligns with the audience's stage in the funnel. Video engagement audiences can be retained for up to 365 days, but segmenting by recency - such as creating separate audiences for 7-day "hot" leads versus 90-day "warm" leads - often delivers stronger results.
Beyond videos, interactions with your Facebook Page and posts also provide excellent opportunities to refine your warm audience strategy.
Build Audiences from Page and Post Interactions
Engagement on your Facebook Page or Instagram profile is another powerful signal for retargeting. When creating a custom audience in Ads Manager, select Facebook Page or Instagram Business Profile as your source. Meta tracks various interaction types, including:
- Page visits, post interactions, and messages (captured by the "page_engaged" event)
- Likes, shares, comments, and link clicks ("page_post_interaction")
- Clicks on CTA buttons like "Contact Us" or "Shop Now" ("page_cta_clicked")
- Direct messages ("page_messaged")
Not all interactions carry the same weight. For example, someone who clicks a CTA button or sends a message is much more likely to convert than someone who simply visits your Page. Create separate audiences for high-intent actions and use direct-response messaging tailored to their behavior.
A fitness studio used this approach by segmenting its Facebook Event engagement into three groups: those marked as "Going" (offered class schedules), "Interested" (sent a $10 discount), and "Event Page Visitors" (introduced to special benefits). This smart segmentation increased event attendance by 38% and first-time memberships by 22%.
Just like pixel-based audiences, engagement audiences can be segmented by time - anywhere from 7 to 730 days. Short retention windows (7–30 days) are ideal for retargeting high-intent users, while longer windows (60–180 days) work better for maintaining broader awareness. Always exclude people who’ve already purchased or completed your target action to improve conversion rates and minimize wasted ad spend. Unlike static customer lists, engagement-based audiences update automatically as users interact with your content, ensuring your targeting stays fresh and effective.
Step 4: Refine Audiences with Advanced Segmentation
Creating custom audiences is just the beginning. The real magic happens when you refine these audiences - adjusting retention periods, combining audience groups, and excluding segments that don’t align with your goals. By using advanced segmentation techniques, you can ensure your ads reach the right people at the right stage of their buying journey. This approach not only improves ad relevance but can also significantly lower your cost per acquisition when compared to basic interest-based targeting. The key is to tailor your messaging to where your audience is in their decision-making process, rather than sending the same message to everyone.
Adjust Retention Periods for Better Timing
Retention periods determine how long someone remains in your audience after taking a specific action. For example, a 7-day cart abandoner is likely still shopping and considering a purchase, while a 60-day cart abandoner might have already moved on. This distinction is crucial - 7-day cart abandoners often yield 8-15x return on ad spend, while longer retention windows can dilute your audience with less engaged users.
To get the timing right, align retention windows with your product’s sales cycle and Meta ad scheduling. For impulse buys, stick to shorter windows like 3–14 days. For more expensive items or B2B services, a longer window of 60–90 days may be more appropriate. When it comes to engagement audiences, such as those based on video views or social media interactions, use a longer retention window - up to 365 days. This provides Meta’s algorithm with more data to identify users likely to convert. As Tom DuPree III puts it, "For every audience on this list, we're going to keep our retention period open as wide as possible to give Meta as many options to choose from as we can. This allows us to leverage the platform's user data to our benefit".
To further refine, create separate audiences based on intent levels. For instance:
- Use a 7-day window for "Add to Cart" users.
- Opt for 14 days for "Product Viewers."
- Keep a 30-day window for "General Site Visitors".
This segmentation allows you to tailor your ads - offering time-sensitive promotions to recent cart abandoners while delivering educational content to casual browsers. Once the retention windows are optimized, you can take your targeting a step further with audience layering and exclusions.
Layer and Exclude Audiences for Precision
Fine-tuning your targeting doesn’t stop at retention periods. You can achieve even greater precision by layering and excluding audience segments. Layering involves combining multiple audiences to narrow your focus, while exclusions help you avoid showing ads to irrelevant users. Both strategies help improve ad performance by reducing wasted spend and increasing relevance.
For starters, exclude recent purchasers (e.g., anyone who made a purchase in the last 30 days) from your prospecting campaigns. There’s no point in showing "Buy Now" ads to someone who just completed a purchase.
When testing Lookalike Audiences, make sure to exclude smaller audiences from larger ones to avoid overlap. For instance, if you’re running both a 1% and a 3% Lookalike Audience, exclude the 1% group from the 3% ad set. This ensures you’re targeting different users and not competing with yourself. Use Meta’s Audience Overlap tool to monitor overlap - anything over 50% is a red flag and requires immediate adjustments.
Layering audiences can also help you zero in on high-value prospects. For example, combine a Lookalike of your top buyers with a behavior filter like "business decision-makers" to reach valuable leads without sacrificing scale. Another tactic is to create a "warm but not hot" audience by targeting 365-day video viewers while excluding 30-day website visitors. This way, you can focus on users who’ve engaged with your content but haven’t recently visited your site.
To keep everything organized, use clear naming conventions for your audiences. For example, a name like "WCA_CartAbandoners_7d_ExclPurchasers_Apr2026" makes it easy to identify the audience’s purpose at a glance. This level of organization is especially helpful as your campaigns grow more complex.
Step 5: Test and Improve Your Custom Audiences
Now that you've refined your audiences, it's time to test and fine-tune them to maximize conversions. Testing custom audiences can help identify which segments deliver better results like lower Cost Per Acquisition (CPA) and higher Return on Ad Spend (ROAS). Campaigns with well-structured custom audiences can achieve a 47% lower CPA compared to interest-only targeting - but only if you’re consistently analyzing and improving based on performance data.
A/B Test Audiences with ADEN's LAB Creatives
To pinpoint your top-performing audience segments, use A/B testing by isolating one variable at a time. For instance, if you’re comparing a 1% Lookalike Audience to a 3% Lookalike Audience, make sure the 1% segment is excluded from the 3% ad set. This avoids overlapping users between the two groups and ensures your conversion data stays accurate.
Run these tests for at least two weeks to gather reliable CPA and ROAS insights. Use the same creatives across all test groups to focus solely on audience performance. Tools like ADEN's LAB simplify this process by letting you generate hundreds of Meta ads on autopilot. This way, you can test different audience segments without waiting on creative teams or spending extra on production.
Pay close attention to ad frequency. Keep it below 3 for prospecting campaigns, and if it climbs above 5 without delivering results, refresh your ads. Additionally, use Meta's Audience Overlap tool to check for any internal competition. If two test audiences show more than 50% overlap, merge them into a single ad set to improve algorithm learning.
Track the Right Performance Metrics
Once your test campaigns are live, focus on the metrics that show whether your adjustments are working. Start with Click-Through Rate (CTR). A CTR below 0.5% suggests a mismatch between your targeting and creative. For awareness campaigns, aim for a CTR between 1.5%–2%. Direct response campaigns, on the other hand, typically need a CTR of 2%–3% or higher to stay profitable.
Next, monitor CPA to gauge efficiency. Retargeting custom audiences should consistently deliver a CPA that’s 2–5 times lower than your prospecting campaigns. If your retargeting CPA matches prospecting levels, it’s a sign to either narrow your audience or improve your creative. For e-commerce brands, ROAS is the ultimate performance indicator. Cart abandoner audiences with a 7-day retention window often achieve ROAS between 8x and 15x.
Don’t overlook ad frequency. If your frequency hits 4+ impressions and CTR starts dropping, it’s likely you’re oversaturating your audience. When this happens, either refresh your creative or expand your audience size. Lastly, for customer list uploads, keep an eye on your Match Rate - the percentage of your list that Meta can identify as active users. Most lists have match rates between 30%–60%, but high-quality B2C lists can reach 60%–80%.
This ongoing optimization process strengthens the custom audience framework you’ve built in earlier steps, ensuring your campaigns continue to perform at their best.
Conclusion
Creating high-converting custom audiences for Meta Ads boils down to five key steps: setting up and configuring the Meta Pixel to track user behavior, uploading customer data to build warm audiences, using engagement signals like video views and page interactions, refining your targeting with advanced segmentation and exclusions, and consistently testing performance to see what works best. These strategies have been shown to lower CPA by 47% compared to interest-only targeting.
This shift highlights the importance of first-party data. With third-party tracking becoming more restricted, your CRM lists, pixel data, and Conversions API integration are now your most dependable tools for targeting. Focus on intent-based segmentation - like prioritizing 7-day cart abandoners over generic site visitors - and build Lookalike Audiences from high-LTV customers instead of general traffic. This ensures your ad spend is directed at users with the highest likelihood of converting.
Looking ahead to 2026, Meta's advanced AI capabilities make broad audiences paired with compelling creative outperform manual interest targeting, especially when leveraging AI tools for Meta ads. Rapid creative testing and automating Meta ad production become critical. Tools like ADEN's LAB streamline this process by producing high-quality static Meta ads in minutes, allowing you to test multiple audience segments without the delays or costs of traditional design workflows. By generating dozens of ads weekly, you can quickly pinpoint winning combinations and scale up with confidence.
Start with a well-configured Pixel and Conversions API, then integrate customer lists, engagement audiences, and strategic exclusions. Continuously test, track CPA and ROAS, and regularly refresh your creatives. The brands that dominate Meta in 2026 won't necessarily have the largest budgets - they'll be the ones producing fresh, data-driven creative and using precision-targeted custom audiences. With these strategies, every marketing dollar can deliver measurable, impactful results.
FAQs
Do I need both Meta Pixel and Conversions API?
Using Meta Pixel alongside the Conversions API is a smart move for more precise tracking and audience creation. Meta Pixel captures key events necessary for building Custom Audiences, while the Conversions API boosts data accuracy and reliability - especially in the face of privacy restrictions and browser limitations. By using both tools together, you can achieve better audience segmentation and improve ad performance, which is essential for running effective Meta Ads.
How big should my customer list be for a lookalike?
For creating effective lookalike audiences, it's best to start with a customer list that includes at least 1,000 contacts. Although the minimum requirement is 100, having a larger source audience - ideally 1,000 or more - leads to better results. Bigger lists improve targeting accuracy and allow for more precise audience matching, which can significantly enhance conversions.
What retention windows should I use for retargeting?
For retargeting audiences, set retention windows based on user behavior. Use 7–30 days for high-intent actions, such as cart abandoners or people who viewed specific products. These shorter windows are perfect for targeting users who are more likely to make a purchase soon. For broader awareness campaigns or audiences with less immediate engagement, go with 60–180 days. This approach keeps your brand on their radar while avoiding excessive ad spend.
Your next ad batch starts here
Finish with a ready-to-test ad batch
Paste your website to generate static creatives. Drop the link → get ads in about 90 seconds → upload them to Meta → scale.
Free to try No prompt writing